I’ve been meaning to share our bathroom makeover for ages, but kept waiting for the light to get better. Turns out, it’s just fairly dark on this side of the house this time of year, so rather than wait for Summer, I figured why not share these moody photos so you can get a sense for the space.
We moved into our home in September of 2019 and both the bathroom and the kitchen were rooms we knew we wanted to tackle. Mostly because both had been done in a very flipper-style using subway tiles and stainless steel hardware. No offense to either of those styles, but it just didn’t fit the mood of our 1920s home. So we set out first to tackle the bathroom, with a plan in mind to make the space feel like it could maybe just maybe be original to the home.
But first up, here’s a little look at the before – This is what it looked like after we had swapped out the light fixture and taken down the shower rod, but you get the idea.
BEFORE

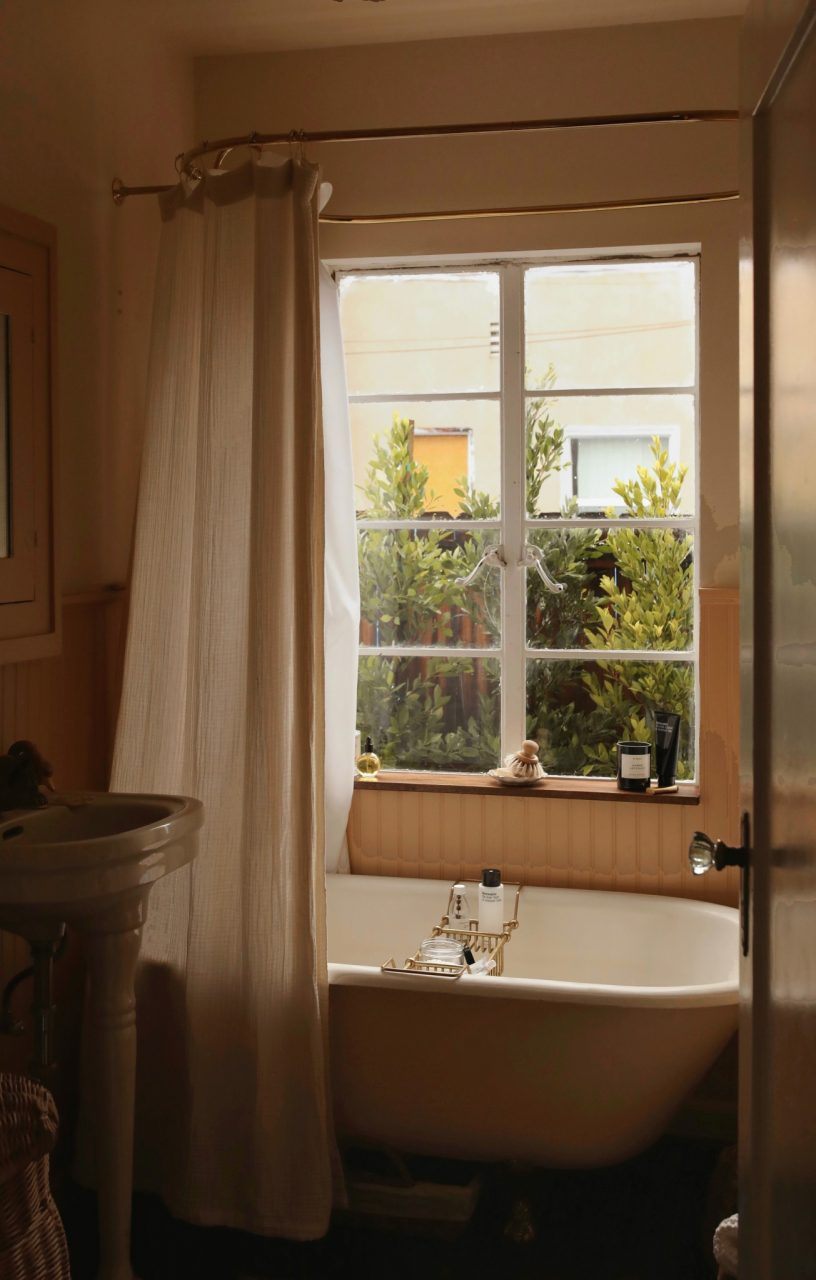
The biggest detail that we wanted to change (aside from demolishing the subway tile) was to switch to a clawfoot tub and to install a larger window. I think every home I’ve ever lived in has had the smallest window possible in the bathroom – and it makes sense from a privacy standpoint, to keep the window placed high to avoid prying eyes. But I knew that I wanted the space to be bright and illuminated, and had this dream of taking a bath with the windows cracked open, looking up at the sunset. I’m fully a romantic and not a realist when it comes to most things, but Eric was on board with the vision too, so SCORE.


Above you can see the progress of demolishing the tile. It was applied in a really REALLY sturdy way – using cement and chicken wire – that made it unbelievably challenging to remove. Normally tiles can be sort of ‘popped’ off of the wall, but that was not the case with these ones. We ended up having to hire a handyman with serious tools to remove it.
In the second photo you can see just how bright the space became with the addition of the large window. This was taken back in August / September, when the sun shone more on that side of the house. You can also see that unfortunately we were not able to salvage the Spanish floor tiles. I had hoped to keep them in the space, but based on the installation, they just wouldn’t be able to exist in the new bathroom.

And here is the after! The windows, tub and the sink are all vintage finds that Eric sourced on Craigslist. The tub was a hot-pink shade with nearly blackened brass feet when we picked it up. It’s shorter than a standard tub, and took a bit of time to find – but based on the width of our bathroom we had a very tight space to work with and had to really hunt to find the right one.
We removed the feet and scrubbed those with this brass polish to remove some the darkness and grime. I didn’t want them to look brand new (that was the goal for the space) so it took a minimal amount of effort. To paint the tub, we used two cans of this spray paint (in shell white). We tipped it upside down and tapped the edges well to prevent the paint getting onto the porcelain – it was surprisingly easy to do!


One of the real challenges we found with installing a vintage clawfoot was finding the right hardware to use with it. It came with taps for just the hot and cold bath portion – but no option for a showered. Initially we thought we could affix something to the vintage pipes, but it was so difficult to make it work. We gave in and ordered reproduction hardware to replace the whole system. It was more than we were hoping to spend, but in the end it’s made everything a lot more sturdy and usable.
The shower head is this one here, attached with this riser (which includes the enclosure for the curtains to be attached to), with this set-up as the faucet.


I think the biggest impact in the room is the casement windows we installed. They came from a 1920s home in Pasadena that was demolished – these windows and the large set in our living room came from the same house. There’s a lot of built up paint + a cracked pane but neither of those details bother me. I like that there’s a history behind nearly everything that we installed in the space and it just makes for a better story in my opinion.
For privacy, we use the shower curtains to cover the windows when need-be. I chose these cotton curtains from Parachute along with a matching liner and I love how they look in the space. Because of the shape and size of the tub we had to order two of each, which is something to think about if you’re considering a clawfoot! In reality we could probably use a third set to FULLY cover the tub, but budget didn’t allow for that just yet.


The sink is another showstopper in the space, and a lot of that is thanks to the hardware. This was also a craigslist find, that Eric hunted down in a house in Pasadena. Eric had to remove the sink himself in order to take it, but it was a steal ($150 total!) and he got to learn a bit more about the piece. The owner of the home explained that his grandfather had built the house himself in the 1910s and had imported this very sink from Europe. I had to spend a decent amount of time cleaning the brass (I used the same polish as we did for the clawfoot tub) but it was worth the effort. While the fixtures aren’t something I can easily link, I did find this gorgeous tap that has a similar feel, just in case you’re interested.
Because of the age of the sink and the fixtures, it was a bit tricky installing it. Eric took the sink to a few different experts, all of which said they had never seen anything that would fit the specific hook-ups. It’s hard to describe, but essentially Eric had to create some fittings of his own in order for it to fully function. You may have also noticed the very bottom of the pedestal looks a little strange – that’s because the sink originally was very short (people used to be smaller, after all) so we added a FLOWER POT (I swear) overturned on the bottom to make up for the height. I love the way the taps look, and it’s just such a good dramatic piece in the space.
For the towel ring we chose this one from Anthropologie, along with a matching towel bar (now sold out), robe hooks, and toilet paper holder.


To give the room a bit of interest we installed beadboard on all of the walls and ran a little ledge around the space. It’s perfect for setting small things while doing my makeup, or even little decor bits as we acquire them. I got the idea for this from Kaitie Moyer’s bathroom renovation. I often look to her page for inspiration and tips on how to bring the vintage charm back to a space.
The wall colors here are palace white by Benjamin Moore for the upper half and creme caramel by Benjamin Moore for the lower half. The floors are hardwood that we installed and stained with this stain, in the shade dark walnut.


And there you have it! Please, if you have any additional questions, leave them below. I’m sure there’s a detail or two that I’ve missed!
12 Comments
-
Courtney Halverson
-
February 05, 2021
I think the sink is my favorite detail in here too. Those SWANS. I’m smitten.
-
Scarlett
-
February 05, 2021
this is gorgeous! I’m a sucker for beautiful historic architecture and it always feels like a crime when it gets covered up or revamped – I think you did a lovely job of bringing this space back in time. I am curious what you ended up doing with the floors since the tiles couldn’t be salvaged. Xx
-
Courtney Halverson
-
February 05, 2021
I know what you mean! Anytime I see a historic home listed online for sale I always cross my fingers and hope that whoever buys it doesn’t just say ‘ew this is all old’ and replace everything vintage with new.
For the flooring, we put down hardwood slats and stained them + sealed them. I think I included the stain color up above, but it’s not too hard! A little tricky in a small space to reach everywhere (and my back still hurts) but it worked out alright!
-
Mila
-
February 05, 2021
It looks like a lot of work but the result is dreamy! I loved how the renovation went and the appreciation you both have for the history and value of vintage things. I really enjoyed this post.
-
Courtney Halverson
-
February 05, 2021
Thank you! I know there is a lot to be said for buying newer things (and it does make things less complicated) but I just love the idea of bringing back some of those original elements that were lost over the years. I’m so glad you liked the post.
-
Ina-Maria Susanna
-
February 05, 2021
Your style is so beautiful and calming! I always enjoy coming on your blog, as it is such an inspiration for me. Thank you!
-
Courtney Halverson
-
February 05, 2021
Thank you so much. I’m glad my blog is a place you like to visit, that means a lot to me.
-
Paige Bernardict
-
February 24, 2021
Do you have a Youtube channel as well with this kind of content on it? I would love to see this post about bathroom remodeling turned into a longer video if possible. Maybe I can share on it on my website. https://www.portarthurbathroomremodeling.com/
-
Charlile Chanders
-
February 26, 2021
This is a pretty great post about bathroom remodeling. I’ve been thinking of starting a blog on this subject myself. Any tips or anything you would recommend that I to avoid? https://www.yakimabathrooms.com/
-
Stephanie
-
June 18, 2021
It’s such a lovely space! I love the floors! You don’t see wood flooring in bathroom spaces often; it makes the space so cozy and charming! If you don’t mind, would you please share where you found it?
-
Lillian
-
August 05, 2022
You did a wonderful job. Most renovations just make everything look so new which isn’t a bad thing but it does get boring after awhile. This space feels so intentional and real! I will be pinning this as inspiration for when I finally get a home <3


Kelsey_thefarmersdaughter
February 05, 2021
All of the details are so incredibly lovely. Especially that sink! I’m in love ♡