

This post – like most of my home-related content – is long overdue. I tend to get hung up on room reveals and project reveals because it seems like the space is never quite done. Part of that is because at any given moment Eric and I have 3-4 house projects going at a time, so things tend to get put on the back-burner from time to time. And another part is that as much as I want a space to be ‘done’ it never feels like it is. There are always small adjustments to make and finishing details that get kicked down the line as we move from one project to the next. And while I know eventually it’ll be complete, it can make it hard to share what feels like an unfinished job.
All that to say that my wardrobe reveal is finally here, and while NO, it’s not 100% complete, it’s certainly far along enough for me to share it with you today. A few of you may remember that over the Summer we switched bedrooms, and moved out of this bedroom in our house. We moved to the front of the house (there’s only 2 bedrooms in this house) and left this space empty for some time. When we eventually decided to transform the closet in our new bedroom into a teensy water closet, we realized that we needed a place for all of our (ok ok, mostly mine) clothing and shoes. So Eric elected to build a custom wardrobe running along one of the walls in our second bedroom and turn it into a sort of walk-in closet.
I wanted to be careful with this space, as I didn’t intend to use it as a ‘cloffice’ like I did with the second bedroom in our last place. I’ll be honest, the idea of having all of my things and purses and shoes on display just really no longer appeals to me, and isn’t something I think I’ll ever do again. It leads to excess and feeling a bit like one is living in a shop of some kind, and that just wasn’t sitting right for me. And while I still have FAR too much and am working daily to whittle it down, I love that I can close the doors on my clothing and wardrobe and have it disappear in a sense.


Eric built these wardrobes on a budget, and while I wish I had step-by-step instructions for you, I unfortunately don’t. Mainly because parts of this were repurposed from our old closet (the standing dividers you can see above were ripped out of an old closet system the previous owners had installed) and the rest of it was pretty much Eric getting pieces of wood and just sort of coming up with his own plan to bring the space to life. We had thought about doing an IKEA wardrobe hack, but we went this route because it was a LOT cheaper. It meant more work and measuring to get it just right, and it also means that I don’t have any handy links to provide. And for that I hope you’ll forgive me!
I knew early on I wanted 3 sets of double doors (which Eric custom made), I wanted it to look like it could be part of the room, and beyond that I just wanted enough shelves and rods to hold all of my things and nothing more. Anything that didn’t fit once the closet was built we got rid of, and it’s made me more mindful of what pieces I choose to keep.

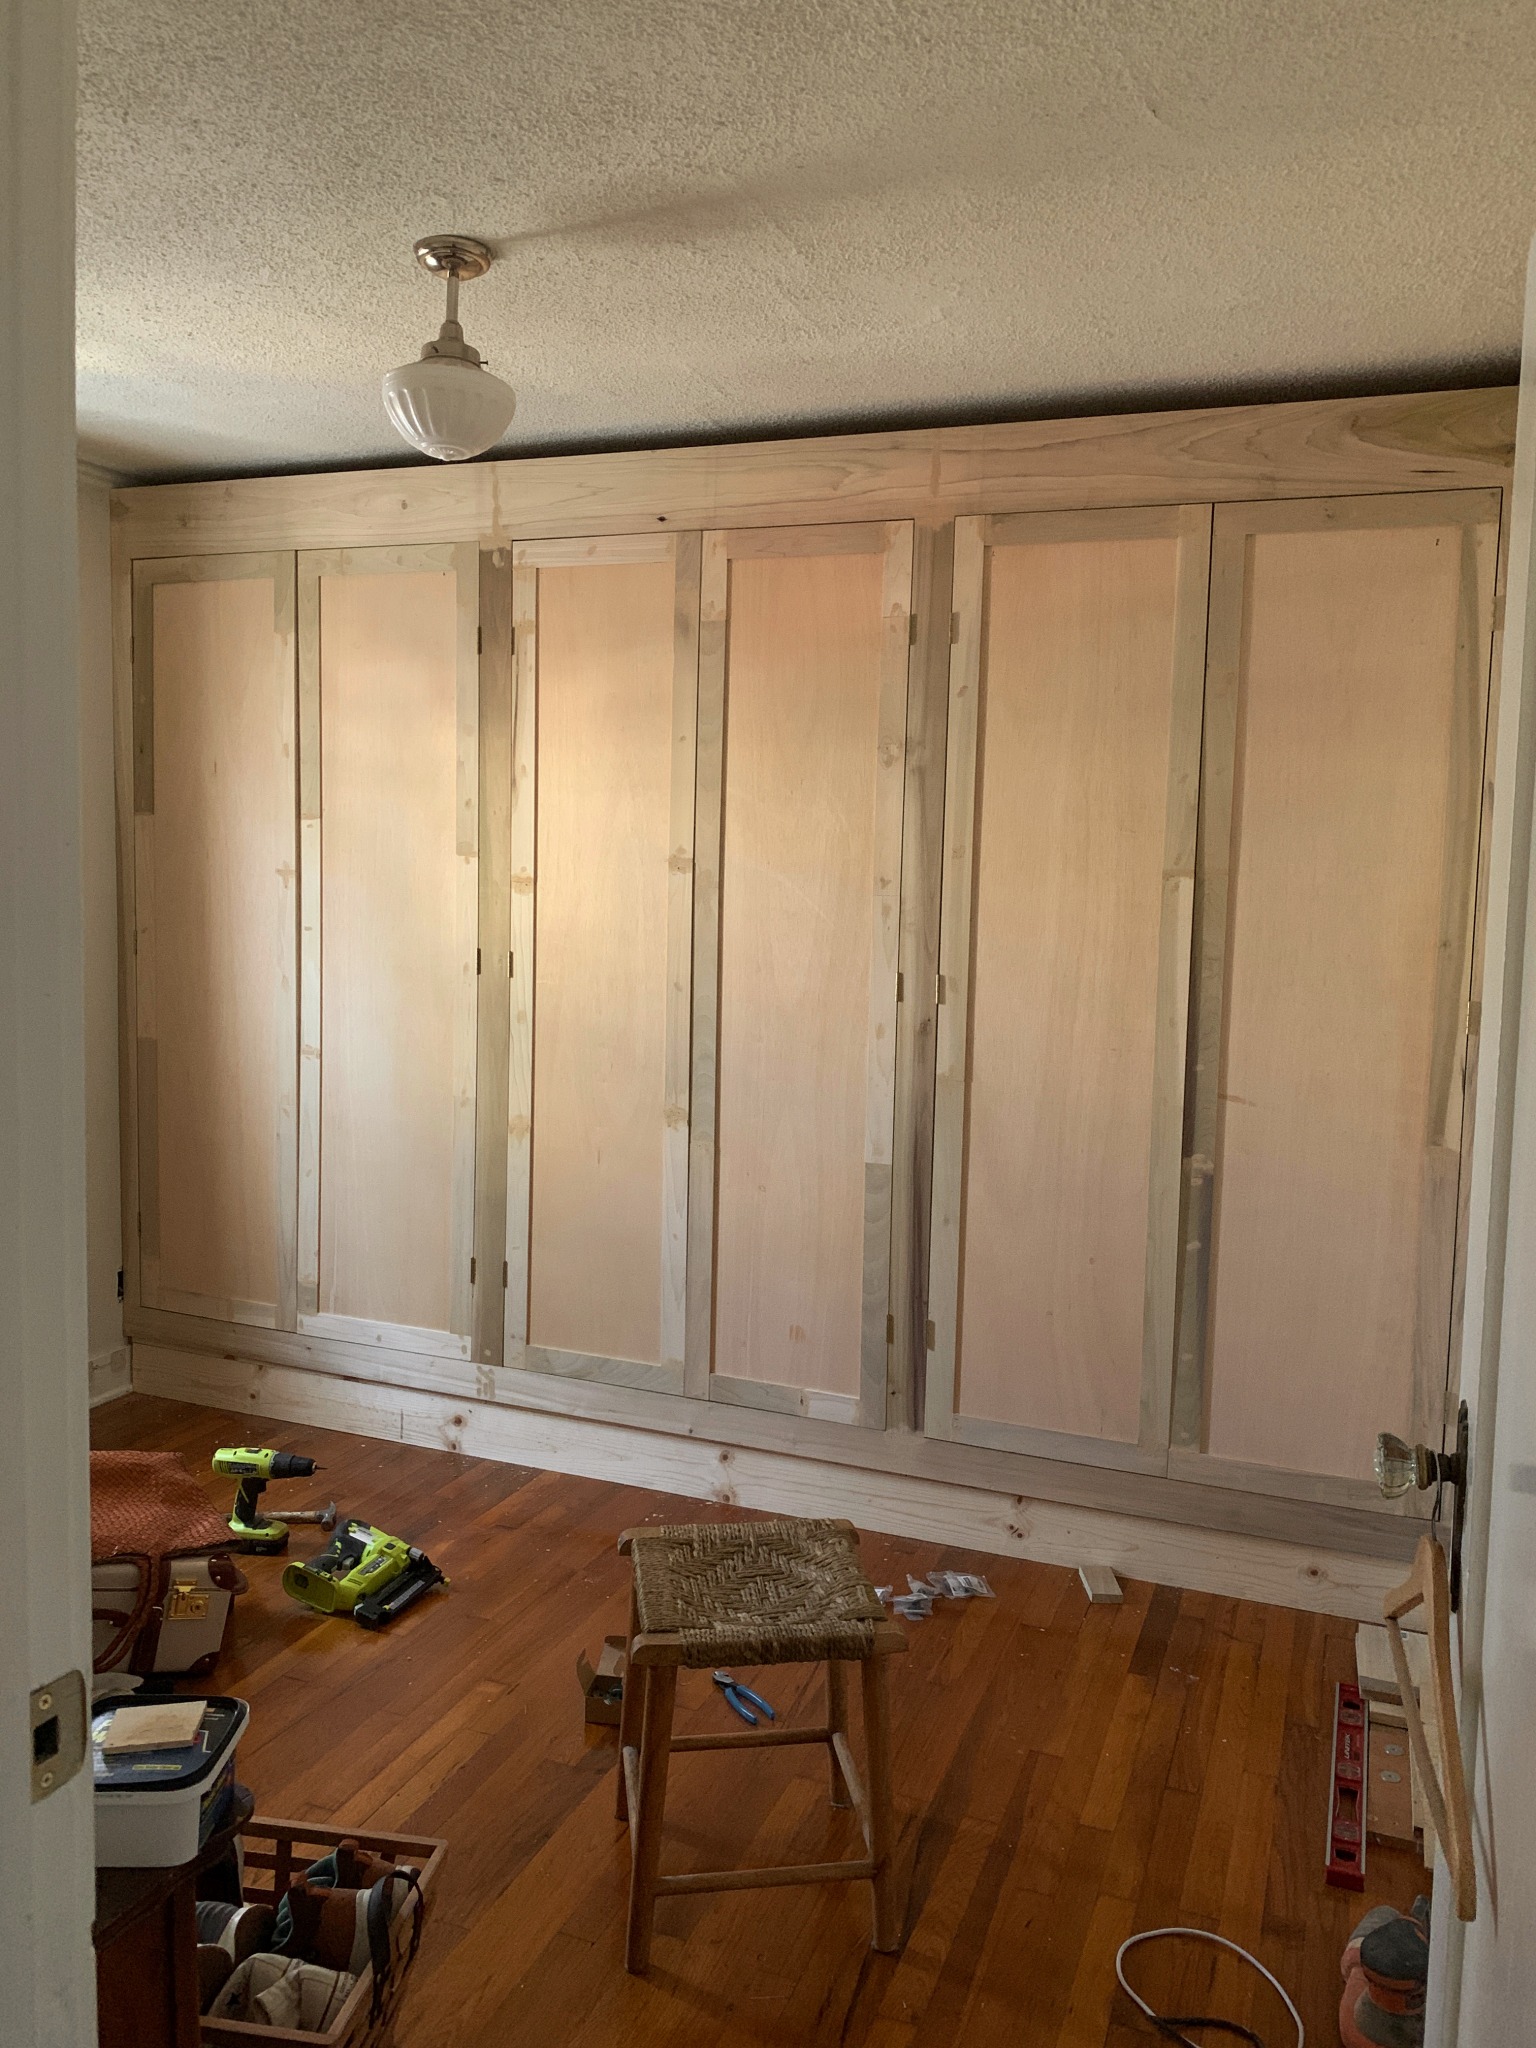
The details I can share with you are the paint color (it’s Celery seed from Magnolia) and the light fixture is this one here with this medallion (identical to the one in our bedroom). Beyond that, what you’re seeing here is what I dreamt up and Eric was able to bring to life by teaching himself how to build cabinets by watching YouTube videos. So if anything, I hope the takeaway here is that you can absolutely do something like this yourself, but you’ll have to figure out just what works for your own space since we are by no means experts.
As far as the plans for the rest of this room? We have no idea! We don’t need a second bedroom for anything, and since I like to work from my desk in the living room, there are no plans to put a desk in here. We may put in a comfy arm chair or a place to hang out, but as of right now, it’s mostly just this closet space. We’re taking the planning and decor with this house (our first house) slow, and trying not to rush anything. Which is why this post took a while to come along, but I hope it was worth the wait.


16 Comments
-
Courtney Halverson
-
April 09, 2021
Yeah I think that display era was such a thing, but to me it just started to feel a bit icky, if that makes sense? Just a bit too peacock-y and I started to feel uncomfortable when friends came over because it felt so over the top. It’s nice to have everything put away now, and I agree! things are more protected too.
-
Kristen
-
April 09, 2021
This is gorgeous! Can you share the dimensions? I’m planning out a closet now; lots of youtube videos!
-
Courtney Halverson
-
April 09, 2021
SO many YouTube videos! Haha, the length of the wardrobe is 10′, and beyond that I think Eric might need to chime in with the rest of the dimensions as I’m a bit clueless. I’ll have him reply to this!
-
Natercia Castro
-
April 09, 2021
I love the use of ‘one’ as a pronoun: like one is living in a shop’. So Edwardian! Furthermore, omg the shoes and purses part is a dream come true! Congratulations to you and Eric for this achievement!
-
Courtney Halverson
-
April 09, 2021
Haha I didn’t even realize I had written it that way, I’ve definitely been watching one too many costume dramas as of late!
-
Ana @galinglasses
-
April 09, 2021
This is brilliant. Thanks for sharing. I’ve been looking forward to this reveal and what great, professional-level work by Eric!
-
Courtney Halverson
-
April 10, 2021
He’s really learned so much! It’s also cool to see the progress of how much better he’s gotten with each project. Makes me feel confident for wherever we end up next.
-
Kirsten
-
April 10, 2021
Where does one get an “Eric”? Not sure they have those at my local Home Depot..
-
Courtney Halverson
-
April 10, 2021
I’m SO spoiled with how willing he is to try new things. I just read this to him and he said “every one has an inner Eric that can be willing to learn” hahaha so there’s that. He also measured and says the dimensions are : 8.5′ tall, 11.5′ wide, and 2′ deep. I’m not sure if that helps, but we mostly just put a hanger in there to figure out how deep to make it. Good luck!! You got this!
-
Bethany Ash
-
May 22, 2021
Thanks so much for sharing your beautiful home updates Courtney! Just showed my husband, as we’re looking to buy our first home and I’ve always dreamed of a built in/walk in wardrobe as it’ll help so much with organisation… and he approves! Definitely will be looking for a place with enough space to build something along these lines. Thanks so much for the inspiration!
-
InBleach
-
May 17, 2022
Looks great. Some advice if do something similar elsewhere; remove the old crown & base molding that’s going to get covered up & use on new ones install. That will help make it look more original to the house. And paint the inside for a more finished look. Congratulations finishing a project is hard
-
Yvonna
-
June 02, 2022
This is such a great set up! What was the overall cost break down? We are debating purchasing a pax wardrobe or starting from scratch. Given the cost of lumber we’re unsure of which route to take.
-
Courtney Halverson
-
June 08, 2022
That is such a good question, and unfortunately I cannot quite say as we used a decent amount of scrap wood from previous projects. We did look into the PAX option but this was much less. I wish I had a more firm dollar amount, probably should have documented that!
-
Angela
-
June 30, 2022
This is exactly what I want to do in my master! The pictures alone help with how the process went and looks much simpler than others I’ve seen. What always makes me nervous is building doors.
-
Michele
-
August 24, 2022
I love this so much. We purchased a home with 4 bedrooms however two of them have no closets so for resale purposes our home is a two bedroom. I’d like to eventually have storage built in both bedrooms however with a base board heater in both, wall space is at a minimum if we want to put a bed in either room. I think this set up but without the middle section (to allow for the base board heater) May work perfectly and still allow for my sewing desk to be placed between or build in a custom sewing area. Thanks for sharing!

Dina
April 08, 2021
Really amazing result! It’s funny you say you were tired of the constant ‘on display’ of your wardrobe. I remember always being a teeny bit envious that people had the space to display their items! Luckily I never went that route, I’ve realize over time that it’s not good for clothes/purses. Putting things away means less dust and extra care to keep all your items in good condition. Excited to see how it will keep evolving my fav part is def the light fixture, really gorgeous ✨