

Our last meal before we started sheltering in place at home was sushi – and I’ll be honest, I think about that meal a lot. Not just because it was the last time we stepped foot into a restaurant, but because it’s something Eric and I crave fairly often. We’ve made sushi at home a fair amount of times, and it’s always a bit of a learning process.
And as we haven’t had fish on hand in some weeks, we decided to make some veggie rolls using what was in the fridge. I am SO glad we did this because honestly? I didn’t even miss the fish while we were eating. Scroll down for instructions as written by Eric (it’s his first blog post, so leave a comment if you like it!), and please remember – we are NOT chefs, but this is what works for us!


From Eric:
For the sushi rice (which is the most important part of making sushi rolls) use a pot on the stove that has a heavy bottom as it distributes the heat evenly and keeps the rice from burning on the bottom.
- First, use only sushi rice as the short grain keeps the roll together and won’t dry out like other types of rice. Measure out 400 grams (or about 1 3/4 cups) of sushi rice and rinse it in a colander until the water runs clear.
- Place rinsed rice in your pot with a heavy bottom and add 360 grams cold fresh water (or about 1 1/3 cups) and let sit for 10 minutes.
- Turn your oven burner on high heat and put the pot with lid on for 10 minutes. DO NOT OPEN THE LID.
- Next, turn your burner on its lowest setting and leave for 10 minutes. YOUR’E NOT OPENING THE LID, ARE YOU?
- Finally, turn off heat and leave for another 10 minutes. DON’T EVEN THINK ABOUT OPENING THAT LID.
- After the resting period, with the lid on the whole time, dump the rice into a large bowl or baking tray or even better, a wooden bowl called a hangiri or oke. Add 132 grams ( or about 1 1/4 cups) of a good high quality sushi rice vinegar. You can make your own with regular sushi vinegar by mixing together 1 cup rice vinegar, 3 tbsp sugar and 2 1/2 tsp of salt.
- Using a rice paddle, cut and slice the rice at an angle to mix the vinegar and cool the rice at the same time. The goal is to get the vinegar absorbed evenly into the rice while it is hot so the excess moisture evaporates. There will be some clumps, simply separate the rice without mushing it with the paddle. Once it is evenly mixed and spread out as much as you can, let sit for 5 minutes then flip the rice over and let it sit with a damp kitchen towel over it until you are ready to start making sushi. It should be lukewarm by the time you start making rolls.
Once you’ve made your sushi rice, use this Youtube video (I have it paused at the start time) for assembling your rolls. In the video he is assembling the rolls with the nori (seaweed paper) on the outside. If you prefer the rice on the outside of your rolls like in this post, just flip it over after the rice is on the nori and continue as he instructs. Good luck!


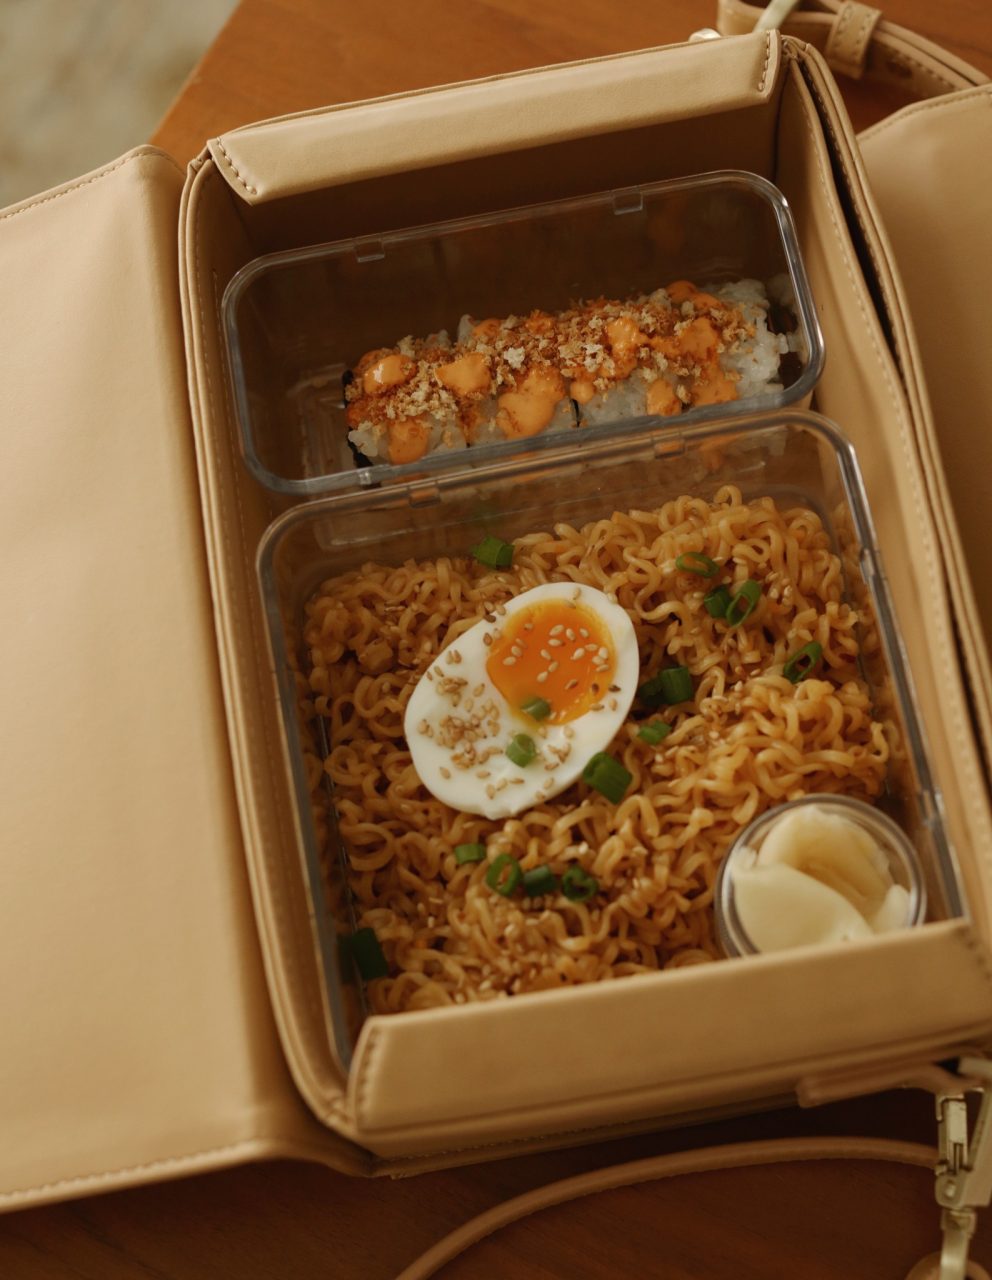
For our rolls we used steamed carrots (use a vegetable slicer to make thin strips before cooking), asparagus, and raw bell peppers and jalapeños. Again, we are NOT experts, but this is what we had on hand and what we used. Add some avocado, some cucumber, treat yourself. And to finish we topped it off with spicy mayo (mix sriracha and mayo together) and some toasted panko breadcrumbs. The toppings are what makes it feel like a fancy meal out, so go all in.


And since we made this meal to have a bit of a car picnic, we decided to make some ramen to bring along too, cause why not. When it comes to ramen, there are SO many amazing brands out there. We only had the Maruchan cheapie ramen on hand, but hey, it’s a classic for a reason! To dress it up, we cook and drain it, add some soy + garlic chili sauce, and then top with toasted sesame seeds, green onions, and a soft boiled egg if we’re feeling fancy. There are countless ways to jazz up ramen, and it’s just always a great idea when you’re stumped on ideas. Plus it goes perfectly with a little veggie sushi.

We packed up our little sushi and ramen picnic in this lunchbox by the brand Inka – and I gotta say, it was so fun to get to use. I love how chic the whole set feels, and I think it will be getting a lot of use in the coming months as Eric and I go for little drives + pack along snacks. Definitely check out Inka if you can, they’re a small business that I see a lot of great things for in the future. [gifted lunchbox]

8 Comments
-
Anais
-
May 17, 2020
Great post you guys 🙂 Can’t wait to try!
-
Jane
-
May 17, 2020
Nice job, Errol!
-
Jane
-
May 17, 2020
Eeeko
-
Marissa
-
May 18, 2020
I loovveee this post. Also the aggressive and informative way Eric went through the process of making sushi. I’ll never touch a lid when making sushi ever again. Also gives more idea on what to put in a sushi AND an informative video. A great experience.
-
INKA
-
May 18, 2020
We are absolutely swooning over this beautiful lunch Courtney!! Your Veggie sushi is so beautiful with all the pretty colors– it’s a favorite of ours as well. Thank you also for the kindest words you’ve written about us, it means the world to a new brand during this time. Sending you and Eric love & a lifetime of good lunch, from INKA xx
-
Estie
-
May 18, 2020
Ha! Me too 🙂
-
Maia
-
May 18, 2020
I have no way of making sushi right now but when I do, I will absolutely use this recipe. Eric made me laugh, I will think of him every time I make rice now!


Rachael
May 17, 2020
Loved this post! Eric did a great job describing the process— and I won’t open the lid to the rice anymore!! Also, I thought it was still Eric when Courtney took back over and imagined him saying the picnic set was so chic!