

I feel like this is the blog post I have talked THE most about writing, and the one that I have put off the longest. Once you start scrolling, I think that will make sense – this is a big one, with a lot of information that I wanted to make sure I got right. And it’s also taken a long time to write because the renovation itself took a long time to complete, mostly because we did the majority of it ourselves. I think social media and reality shows have conditioned us to think that a renovation is something that happens relatively quickly, largely off camera, facilitated by a big crew working behind sheets of plastic with an air of mystery until the final reveal. There’s certainly nothing wrong with any of that, but that isn’t how our renovation went down.
Because we were working with a budget and because we started this in the middle of the pandemic, hiring a crew just wasn’t in the cards for us. Eric and I have done much of the work to our home ourselves for the sake of spending less money. We’ve been able to do that because while we don’t have an endless financial budget, we do have the privilege of working from home and setting our own hours. We are privileged with the amount of time we could dedicate to not only learning how to renovate a kitchen but also making it happen. We knew we could get by with cooking on a grill, washing dishes in the bath tub, maybe having a few too many take-away meals, and so we jumped in head first.
And let me be clear that when I say we, I’m being a bit generous; Eric did a LOT of the work himself while I worked on emails, content, and photoshoots. And there were times where we did have some help; when it came to things we felt we couldn’t do (like framing out the new-to-us windows) we hired a very talented handyman to assist. But the majority of this kitchen came to life with our own sweat and sometimes tears.
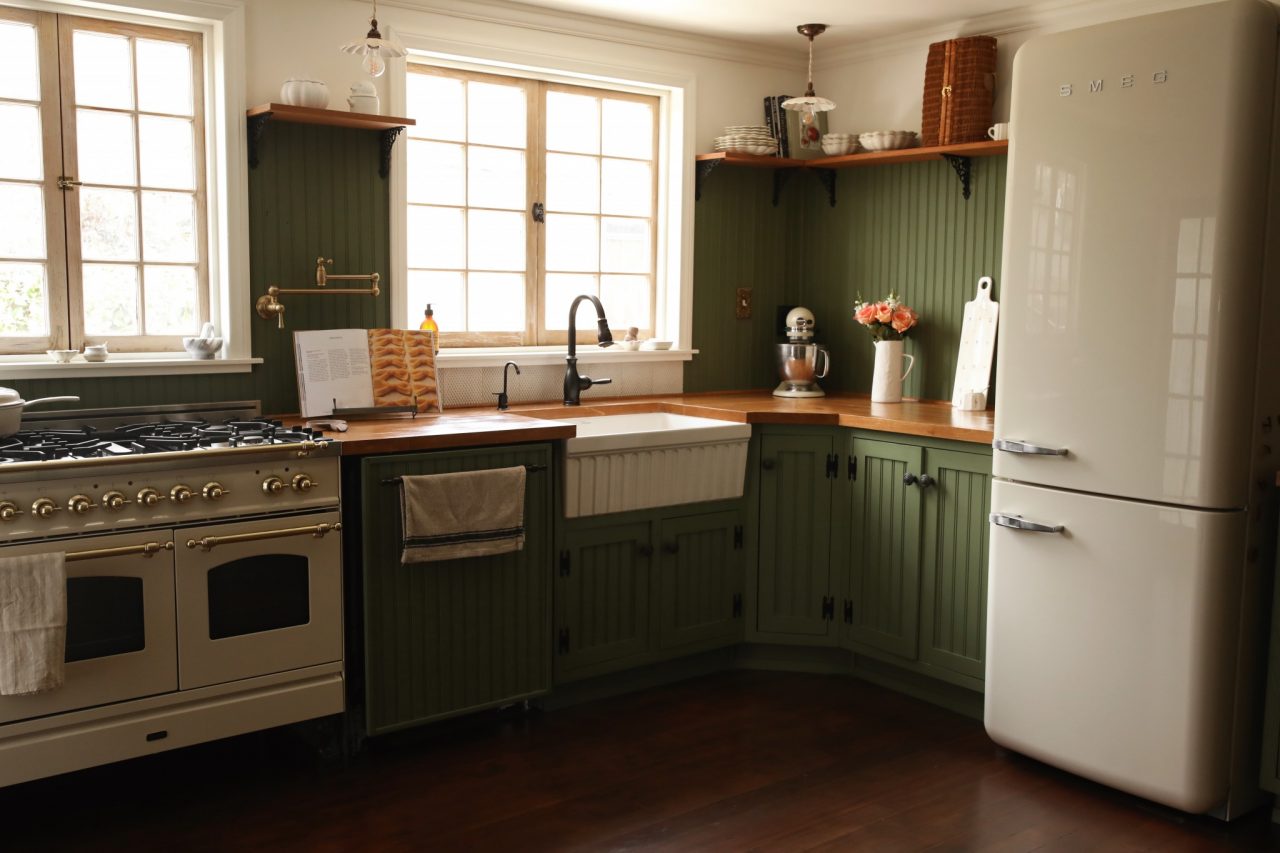
Here is what the space looks like today:


Before
It’s been a while since I’ve shown a true ‘before’ photo, so just in case you don’t remember; here’s what the kitchen looked like when we bought our home two years ago. The space is staged for the listing photos, but this is pretty much what it looked like when we moved in.


I have to preface the rest of this post with this : our “before” kitchen wasn’t bad at all. The floors were in rough shape, sure, and the layout was really puzzling, but it’s not like we moved into a disaster scenario and made it into an oasis. I think our main qualm (again, aside from the layout – the washer and dryer took up SO much space) was that it just lacked charm. Our home is from the 1920s, and the kitchen just felt a bit like a flipper-kitchen. It had details that we didn’t love, like the barn door (made out of plastic) the subway tile (nothing wrong with it, but not my thing), but overall it served us well for over a year before we made major changes.
The Process
So here is the part that I’ve had the hardest time writing, and that is the process of actually getting from point A to point B. And that’s probably because we didn’t exactly take a straight line to get there. We started in late November, and really only completed things in March – with plenty of finishing details happening just a few weeks ago. But I’m going to do my best to chronicle what we did and provide as many links as I can along the way. Buckle up, let’s go.
Our first major decision was regarding the layout. When we purchased our home, there was a large wooden island in the direct center – and it made sense with the original layout. With very minimal usable counter space (just on either side of the sink) the island was largely used as a place to prep meals. We didn’t love how much space it took up, so we knew it had to go.
Then we tackled moving our washer and dryer out of the kitchen. While not uncommon in many parts of the world, in the US, it’s not especially common to have your laundry set-up in your kitchen. I think it wouldn’t have been an issue with smaller units that could fit underneath a countertop, but the pair we had were LARGE. We sold them and purchased much smaller appliances that we relocated into a closet in our hallway. It immediately opened up a lot of potential counter space real-estate, and we could start to visualize the completed space. Sort of.


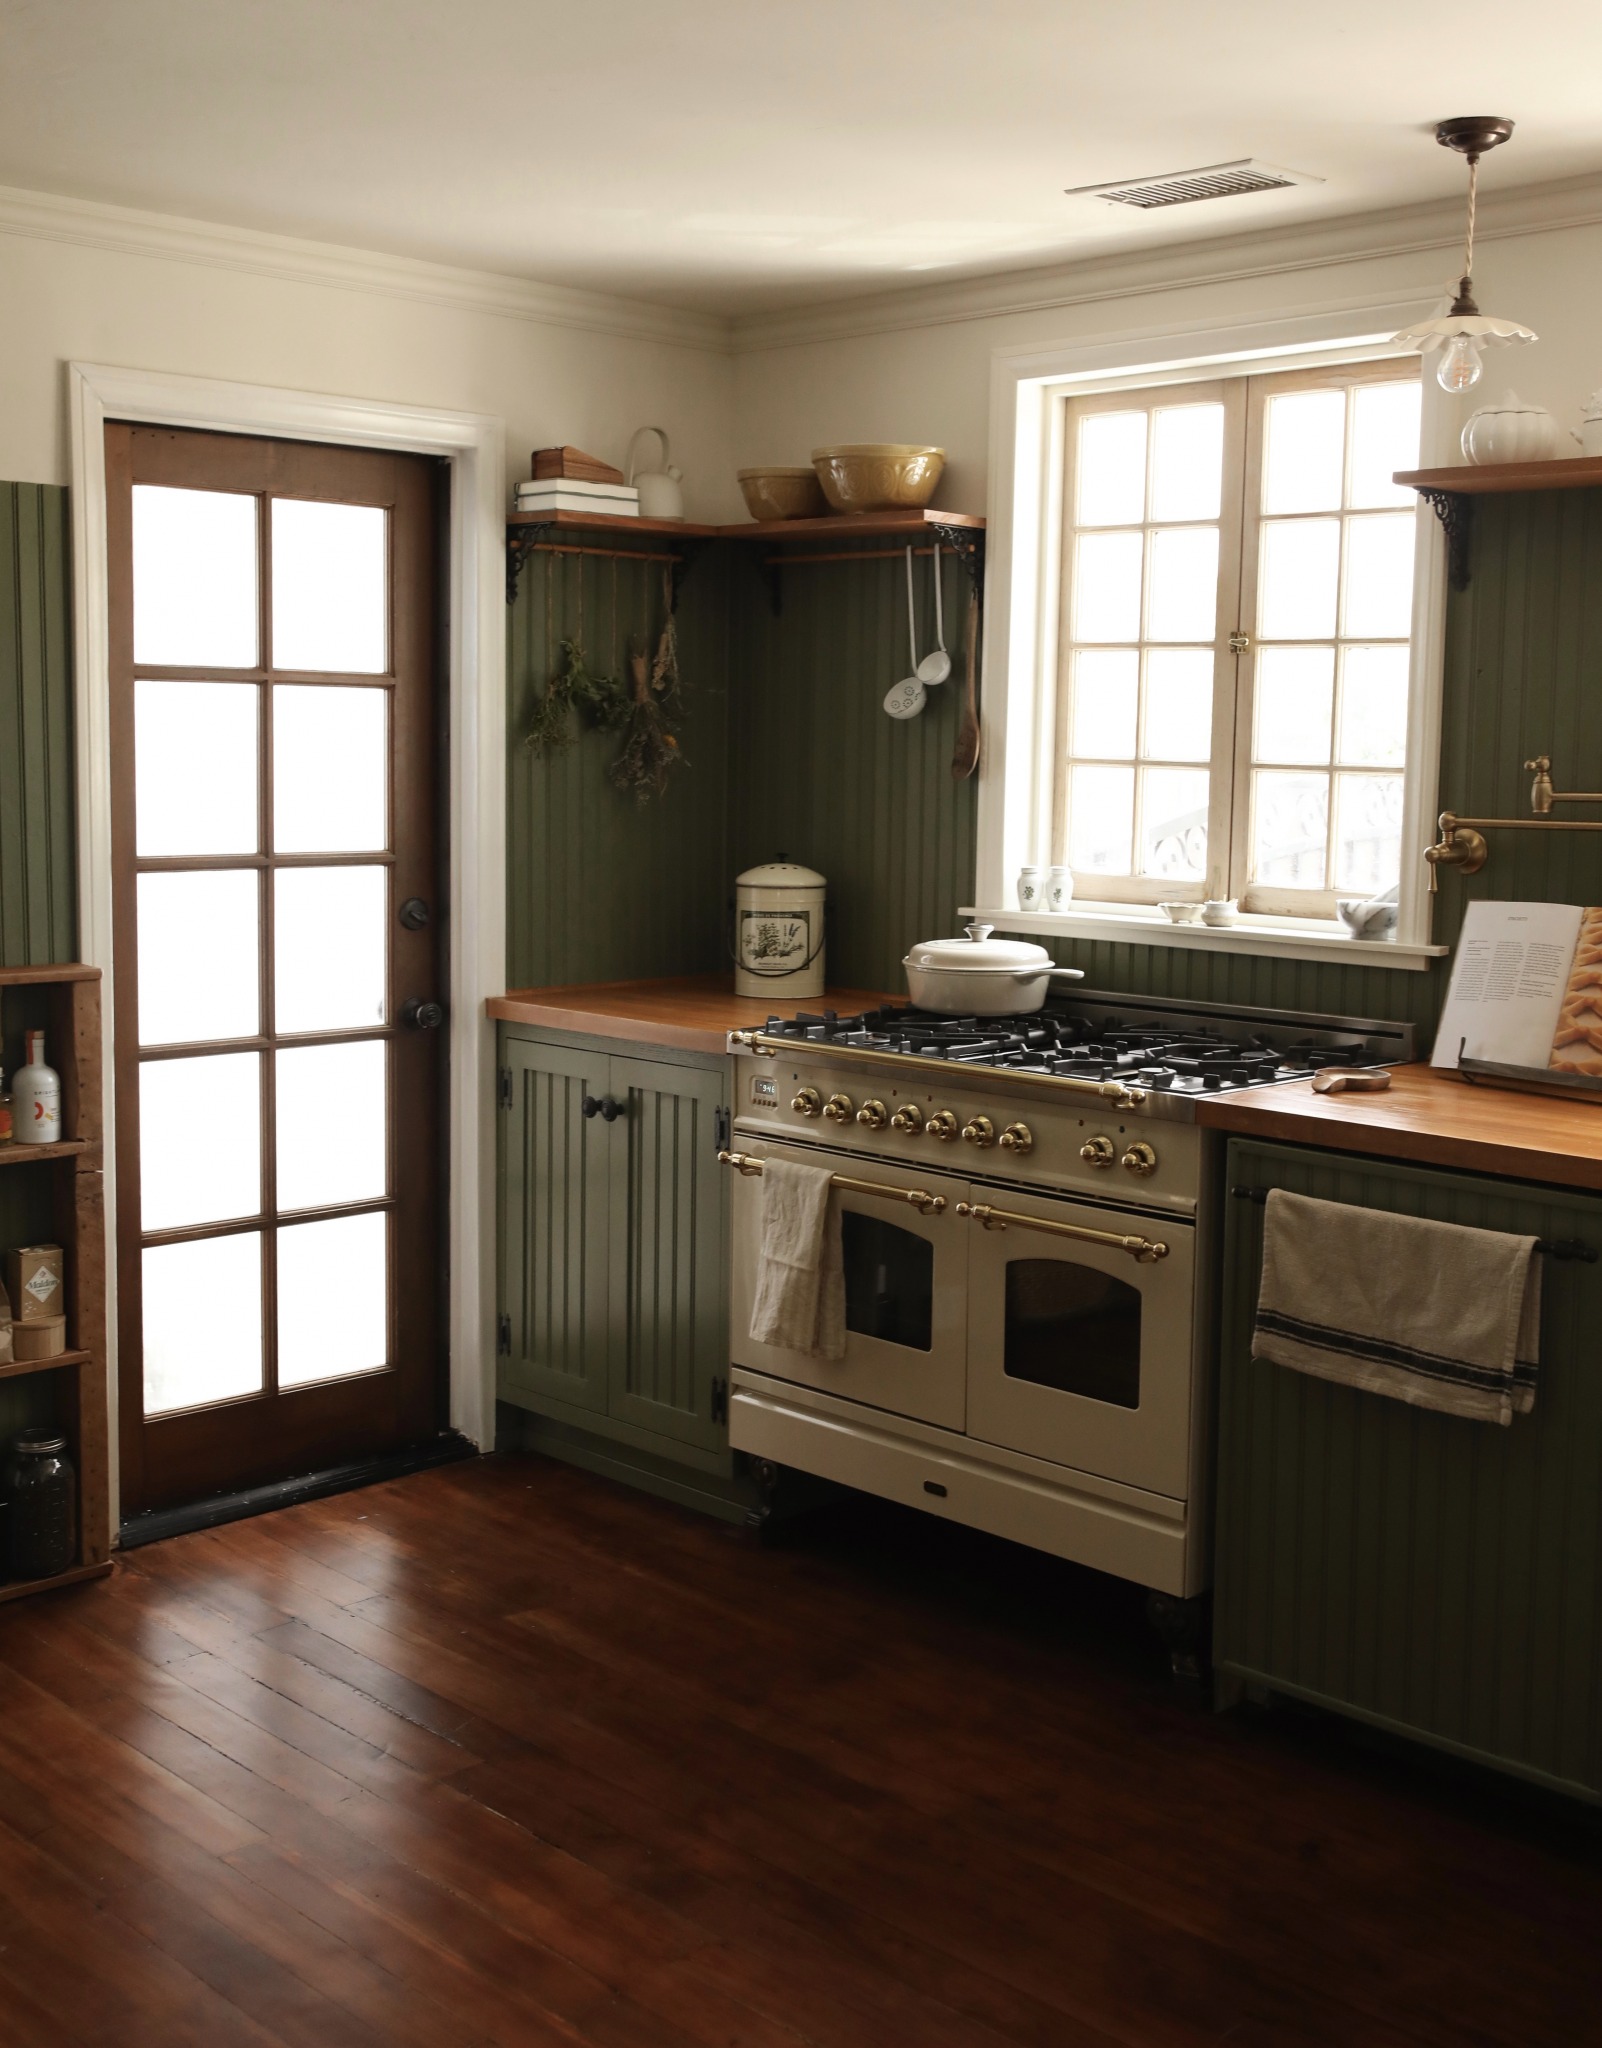
Around early December, we decided to start demo-ing the walls. First was removing the subway tile, and then removing the walls around the windows and door. The original windows in the space felt just too modern, and I dreamt of having a more cottage-y look with windows that could open outward. We got lucky by searching Craigslist, and found these two windows for $20 total. Score. We also decided to replace the door (with the largest doggy door that Mops never used) with a vintage one we found at a salvage yard.
For the door installation and the framing of the windows, we had help. Some of the wood behind the sink needed replacing, and we added insulation where there previously was none to help with heating and cooling costs. Getting into the walls was one of my favorite parts in all honesty; because of the age of the home, the wood inside of the walls is actually gorgeous redwood. The trees are now protected, but in the 1920s it was widely used in our area. Because of the uniqueness of the wood, we kept every salvageable piece to use for future. We didn’t have a plan of what to do with it, but it felt like a really big shame to just throw out something of such historical significance.


Once the walls were back in place and smoothed, we began to add beadboard to the space. I spent much of last year watching costume dramas, and a lot of the look of this kitchen was inspired by countless episodes of Downton Abbey – namely Carson’s office. The ceiling in the kitchen is lower than the rest of our house thanks to an update made in the 90s that we couldn’t easily undo, so we decided to just lean into the coziness of it and go for an English kitchen meets countryside cottage. By placing the beadboard 3/4 of the way up the wall, we hoped to make the room look taller with a bit of a tromp l’oeil effect that I think really worked. This process was time consuming, but once the wood was in place I could really see what the end result was going to be.
Our initial plan was to save the cabinets along the windows and in the corner, but ultimately they were in too bad of shape to do so. We were bummed to have to spend more than we had planned, but it had to be done. We ended up ordering wood cabinets online with custom measurements (from cabinetnow.com) and chose in-set doors that felt like they matched the beadboard walls better than we had imagined. This was our first splurge, ordering cabinets – which made our second splurge (the pot-filler) a lot easier to digest. We centered this brass pot filler between the windows and installed it ourselves with only one major mishap, in which the whole thing rocketed off the wall and sprayed water at me when we first turned the water on. That was how we learned the importance of water pressure regulation.
At this point you may be noticing a pattern of trial and error, and not a real master plan. I must confess that when we started we didn’t really know what we’d end up with. Each decision was made one step at a time, and it is by sheer luck that the end-result looks like it was planned, because OH BOY was it not.

Above is what the space looked like around Christmas. Because we weren’t able to see friends and family safely, we ended up working on the space over the holidays, including on Christmas Day, albeit with a glass of bubbles in hand and an at-home lobster roll kit in the fridge. You can see that the dishwasher and the oven are actually still hooked up here, and we were intermittently able to use both during the renovation, while still installing the details around them. The pile of pots on top of the dishwasher was strategic, because without them the whole thing would tip forward when the door opened.
And since we’re talking about the dishwasher, this was the biggest appliance we chose to keep. It came with the house and works great, so there wasn’t a real need to replace it. We did come up with a way to disguise it in the final design, which you can read about here. Again – nothing we really had thought of prior to diving in, but once we had the beadboard on hand, it felt natural to just keep going with it.


Our idea from the beginning was to do butcher block counters in the kitchen. It’s low-cost, low-maintenance, and just adds a warmth to the space. Eric ordered two large pieces of butcher block and in our backyard he worked on cutting them to fit. I stained and sealed them, and we carefully put them into place.
You can see here that the walls and the cabinets were painted at this point. The idea to go with green was one that came to us early on, but took a while to commit to. We were worried about it being ‘too much’ to have both the same shade (Backdrop’s Lawn Party) but in the end I’m so glad we made the leap. It’s probably the detail that is noticed first when entering the room, and the light in the late afternoon looks beautiful with this color.


Our next major hurdle was the floors. Had we planned to refinish them from the beginning, we would have completed this step much earlier in the process. In all honesty we were willing to live with the scuffs, scratches, and considerable wear. But once we saw all the other shiny bits and bobs go in, it felt like we would be cheapening the space by skipping this step. So Eric rented a sander from Home Depot, spent a whole day and a half sanding (we had to use this small one as the large floor sander they had was broken) and then repaired a few loose boards. I then set to staining and sealing the boards which took the better part of a weekend.
They absolutely did not come out perfect, but we didn’t want that. We wanted the character and the charm that these old floorboards had, and simply wanted to breathe new life into them. The before and after below really shows the transformation, and it’s something we’re both proud of.


The Appliances
So now that you’ve seen how we got a lot of the major details done, let’s dive in on some specifics; namely the appliances that really helped to elevate the final look.


The Oven
Easily the biggest upgrade from the original kitchen was the oven. When this beauty from Ilve arrived, Eric and I both were speechless. Partly because we weren’t confident about being able to get it into the space ourselves (we did manage it in the end!), but mostly because of just how beautiful it is. It is a showstopper in every respect and while it is an investment, if you like to cook and bake as much as we do, it is well worth the splurge. This particular model has 5 burners, two ovens, and even a rotisserie spit attachment. It is beautifully made in Italy, and I think my favorite detail is the claw feet it stands on. This was the first appliance we chose for the space, and in full transparency, we did receive a discount in exchange for coverage on my blog and instagram. We chose it because we love to cook, and because we loved this creamy/almondy color – which ended up being what we used as inspiration for the other appliances.


The Stand Mixer
Because I wanted our appliances to at least loosely match one another, I actually did a bit of a DIY on our stand mixer that we’ve had for years to help it blend in. In case you missed it, click here to see a before as well as how I achieved this look. It’s been a few months and it still looks just as good, so I’m calling this one a major money-saving success!


The Fridge
This was the last detail to go into the space, and oh how this Smeg fridge just completes the room. I was able to find this beautiful cream shade that matches the stove perfectly and I couldn’t be happier. This is the taller model, and while it looks quite large next to me in the photo, it really fits the space well. I love how the interior looks, the drawers, and the freezer on the bottom. It works beautifully and is definitely worth the hype! In full transparency, this fridge was given by the brand in exchange for coverage and images, but it in no way changes my feelings. I had already fallen in love with the brand and owned the matching toaster for years, so this was just a dream partnership come true.
THE FINER DETAILS


THE SINK Area
Once I knew I wanted an apron front sink, Eric and I began to search high and low for the right one. We found a lot of spendy options, but ultimately landed on this one. I love the fluted front of it that echoes the beadboard, but if that’s not your style, it is actually reversible – genius. We did also keep our touchless Moen faucet and I’m so glad, because it is incredible. The finish on it feels very cottage-y, but the technology is what makes it special. We found a matching filtered water tap, and installed these deVol tiles as a bit of a backsplash. I would have loved to have done more, and rreeeaaally would have loved to do a full deVol kitchen, but it just wasn’t in our budget. Still glad I got to incorporate a few elements, and these handmade tiles really work for the space.

THE POT FILLER
I mentioned the pot filler above, but I feel it deserves another look because it’s probably the item we debated the most. We wondered if it was just something that seemed “nice in theory” but totally unnecessary, given the proximity of the kitchen faucet to the stove. We use it CONSTANTLY and it makes things so easy. We eat a good amount of pasta, so it was put to the test right away. It’s both handy and extremely satisfying to use, so if you’re debating one, I’d say go for it.

THE LIGHTS
Oh these liiiights. Once we decided to splurge on these handmade pendants (from deVol of course) it helped inform some of the other choices. We chose tiles that matched them, and even the dishes stacked behind were chosen because they felt like the matched. The kitchen before just had one central light, so we were often struggling to make meals at night. Now with 3 of these fixtures, we not only had even lighting, but beautiful pieces to admire during the day when they’re not in use.


THE SHELVES
We had planned initially on doing a small ledge at the top of the beadboard (similar to what’s in our bathroom) but once we got started, we realized it was a good chance to do open shelving in a dramatic way – all the way around the kitchen. Our plans were to have it continue above the fridge, but once we went with a taller model, we ended up breaking it up there and then continuing just past it. I love the way it turned out – Eric just cut some wood himself and I stained it the same as the counters. We sourced these wrought iron brackets that feel so Victorian and cottage-y and even added a dowel in a few spots to hang some necessities from. The design is not only sturdy but really eye catching.


THE OPEN SHELF
The final detail that I’ll share today is the open set of shelves we created on the wall near the door. In the original design, this space was eaten up entirely by the large faux barn-door. We knew we wanted to get rid of the door, but weren’t entirely sure what to do with the space. We ended up getting the idea for this after we demo-ed into the walls and removed some of the redwood framing that I mentioned above.
All of the pieces you see here were once inside of the walls when the home was built nearly 100 years ago. You can see the some of the rings on the wood and it’s clear these pieces were made from a very old tree – one that may have been around for centuries before becoming a construction material in the late 1920s. We elected to just seal the wood with clear seal, and to keep all of the little notches and nails and imperfections as we found them. I really love that we were able to (in our own way) save just a little bit of what makes this home special.

And now you may be wondering – what about the other side of the kitchen, with the pantry? I’ll share what we did there in my next post – stay tuned.
LINKS
- Smeg Fridge
- Smeg Toaster
- Stand Mixer
- Ilve Stove
- Moen Faucet
- Water Filter
- Apron Sink
- deVol Dovehouse Tiles
- Pot-Filler
- Dishwasher Handle
- deVol Pendant Lights
- Scalloped Bowls
- Scalloped Plates
- Le Creuset Pot
- Wooden Knife Holder
- Spice Jars
- Mason Jars
- Shelf Brackets
- Cabinet Knobs
- Cabinet Hinges
- Light Switches
- Light Switch Covers
Paints Used
Lawn Party by Backdrop
Pearly Cotton by Magnolia
6 Comments
-
Vicki
-
August 27, 2021
I absolutely adore this kitchen. You and Eric have the most amazing and exacting taste. Love all of your before and after. Especially the afters. Such a dream kitchen
-
Raygan
-
August 27, 2021
So so beautiful! I’m glad you touched base on what renovations are like on the other side of being able to hire a glamourous, talented team to help you when you’re working with a budget and also deciding on elements as you go! My husband and I have been in the renovation process of our kitchen and guest bathroom for the better part of a year and we are constantly having to remind ourselves that we’re doing the best we can and it will all be worth it in the end. I so love how everything turned out for you guys! <3
-
Adeline
-
August 29, 2021
Wow! This post is really inspiring: thank you! The choices of style for your kitchen make total sense; sometimes one just needs to remember the decade in which their house was built. In your case, the result is stunning. I will remodel my kitchen next year (fingers crossed) and my goal is to find the right mid-century feel, since the house was built in the late 1960s. *hugs from France*
-
You Are
-
September 25, 2021
You talk about it as your home, your kitchen… but it was never really yours. You bought to it flip it. You probably lied to the people you bought it from, who had most likely loved it despite its seemingly horrid style, and you took the house apart piece by piece. You never intended to live there. You intended to make money. And that you did. But don’t ever say it was your house.
-
Bettsi
-
May 17, 2022
What a dream kitchen! Love the beadboard and shelf option that you did. Amazing that you did it all yourselves- bravo!


Ana @galinglasses
August 27, 2021
I just loved reading through this & have been waiting so it was super exciting that it’s finally here!! We will be doing our kitchen soon and there is so much inspo here. Also, I have the SMEG cream appliances as well & just love love love them!!